

Last Updated on: 23rd May 2026, 09:53 pm
TL;DR:
- Discovering a hacked website is highly stressful, but proper preparation enables faster, more effective recovery.
- Removing malware involves thorough scans, file replacements from official sources, database inspection, and credential updates to ensure security.
Discovering your website has been hacked is one of the most stressful moments you can face as a site owner. Traffic drops, Google flags your pages, visitors see malware warnings, and your reputation takes a hit fast. Knowing how to fix a hacked website quickly and correctly makes the difference between a few hours of recovery work and weeks of lost business. This guide walks you through every stage: what to prepare, how to remove malware from your website, how to verify the cleanup, and how to prevent website hacking from happening again.
Table of Contents
- Before you start: what you need to fix a hacked website
- Step-by-step malware removal and cleanup
- Verification and recovery after cleanup
- Long-term security hardening and prevention
- My take on fixing hacked websites
- Choosing a secure host makes recovery easier
- FAQ
Before you start: what you need to fix a hacked website
Jumping straight into deletion mode is one of the most common mistakes people make. Before you touch a single file, take a few minutes to gather everything you need and set up a safe working environment.
What to collect before you begin:
- A forensic backup of the current hacked state. Taking this backup before cleanup is critical. It helps you trace how the attacker got in and gives you a fallback if cleanup breaks something.
- Your FTP or SSH credentials and hosting control panel login.
- Your hosting provider’s support contact. Many hosts have a security team that can assist or at least confirm the scope.
- A list of all plugins, themes, and the CMS version currently installed.
- Access to your domain registrar in case DNS records were tampered with.
Tools worth having ready:
- A malware scanner such as Wordfence, Sucuri SiteCheck, or MalCare.
- A clean local copy of your CMS core files (downloaded fresh from the official source).
- A staging environment or maintenance mode plugin to take your site offline during cleanup.
Pro Tip: Put your site into maintenance mode before you start cleaning. This stops visitors from landing on infected pages and prevents search engine crawlers from indexing more flagged content while you work.
One thing many guides skip: your security mindset going into this matters. You are not just removing bad files. You are investigating a crime scene. Every suspicious file you find is a clue about how the attacker entered, and that entry point needs to be closed, not just cleaned around.
| Task | Why it matters |
|---|---|
| Forensic backup | Preserves evidence and provides a fallback |
| Fresh credential check | Confirms you have full access before starting |
| Staging or maintenance mode | Protects visitors and search rankings during cleanup |
| Malware scanner ready | Speeds up identification of infected files |
Step-by-step malware removal and cleanup
This is where the real work happens. The manual cleanup process for a WordPress site typically takes around 90 minutes, with initial scans alone running 10 to 30 minutes. Set aside enough time and work through each step without rushing.
Run a full malware scan. Use Wordfence or a similar security plugin to scan every file on your server. Note every flagged file, its location, and the type of threat detected. Do not start deleting yet.
Inspect flagged files manually. Open each suspicious file in a text editor and look for encoded strings (base64 blobs are common), unfamiliar function calls, or injected iframe tags pointing to external domains. This manual review prevents you from deleting legitimate files that were flagged by mistake.
Replace core files, themes, and plugins with clean originals. Simply deleting suspicious files is often not enough. Attackers frequently modify legitimate files rather than just adding new ones. Download fresh copies of your CMS core, every active theme, and every plugin directly from their official sources, then overwrite the existing versions entirely.
Check your database. Malicious code often hides in the “mu-plugins
folder or inside database records. Search your database tables for known malware strings likeeval(base64_decode,<iframe`, or unfamiliar admin user accounts. Remove anything that does not belong.Change every password and regenerate security keys. Update your CMS admin password, FTP and SSH passwords, database password, and hosting control panel password. In WordPress, regenerate your secret keys in
wp-config.phpusing the official key generator. This invalidates any active sessions the attacker may still hold.Remove unknown admin accounts. Attackers routinely create hidden admin users as a backup access point. Review your user list carefully and delete any account you did not create.
Scan for backdoors. This is where many cleanups fall short. Attackers leave hidden backdoors that auto-reinfect the site after you clean it. Common locations include the
uploadsfolder (which should never contain PHP files),wp-includes, and any writable directory. Search for PHP files in places they have no business being.Handle ransomware carefully. If you are dealing with a
.sorryransomware attack, do not attempt manual cleanup on the compromised host. Ransomware encrypts files at the host level, and reusing that host risks immediate reinfection. Restore from a known good backup on a freshly patched server instead. Paying the ransom demand carries no guarantee of file recovery and should only ever be considered as an absolute last resort with professional guidance.
Pro Tip: After replacing all files, run a second scan with a different tool than the one you used first. Different scanners catch different threat signatures, and a second pass often surfaces things the first one missed.
Verification and recovery after cleanup
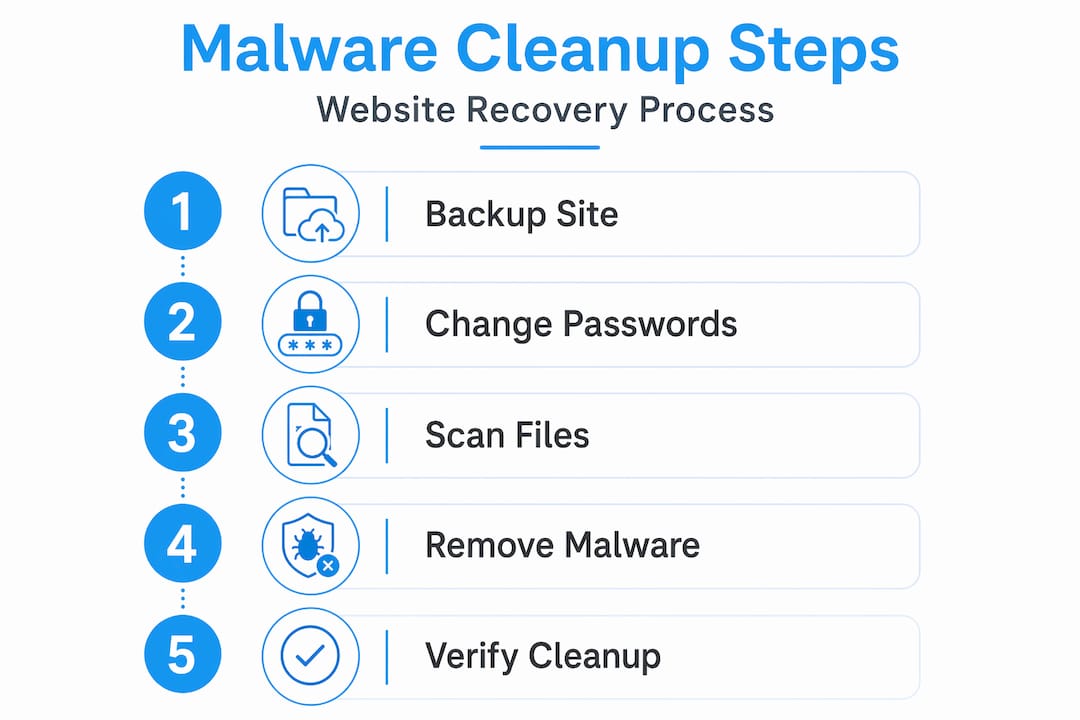
Cleaning the files is only part of the job. You need to confirm the site is actually clean, restore normal access, and clear any security warnings that are still showing to visitors or search engines.
Start by running your malware scanner one more time on the fully cleaned site. If it comes back clear, you can move to the next steps with confidence.
Steps to verify and restore your site:
- Submit a review request through Google Search Console under the Security Issues report. Google re-evaluates hacked site warnings within 24 to 72 hours after a request is submitted. Warnings persist until Google confirms the issue is resolved, so submit the request as soon as your cleanup is complete.
- Check your site’s access logs for any remaining suspicious activity. Look for unusual POST requests, repeated login attempts, or traffic from unfamiliar IP ranges.
- Test all major site functions: contact forms, checkout flows, login pages, and media uploads. A cleanup that breaks core functionality is almost as damaging as the hack itself.
- Confirm that browser security warnings (the “This site may be harmful” messages in Chrome or Firefox) have cleared. These warnings can linger even after cleanup until Google processes your review request.
- Restore your site from maintenance mode only after the scan is clean and you have submitted the Google review request.
One detail worth knowing: if your hosting provider flagged your account and suspended it due to the hack, you will need to contact their support team directly with evidence of your cleanup before they restore access. Most providers have a defined process for this, and the sooner you reach out, the faster your site comes back online.
Long-term security hardening and prevention
Once your site is clean, the goal shifts from recovery to making sure this does not happen again. Effective website security is an ongoing practice, not a one-time fix. Most breaches trace back to outdated plugins, abandoned themes, or weak credentials.
Core hardening steps to put in place:
- Keep your CMS, every active theme, and every plugin updated. Set automatic updates where possible.
- Remove any plugin or theme you are not actively using. Abandoned extensions are a common entry point even if they are just sitting deactivated on your server.
- Enforce strong passwords and enable multi-factor authentication (MFA) on all admin accounts.
- Implement a web application firewall (WAF). Services like Cloudflare’s free plan provide meaningful protection by filtering malicious traffic before it reaches your server.
- Force HTTPS across your entire site and keep your SSL certificate current. See Digihost Guide’s breakdown of SSL certificate importance for a clear explanation of why this matters beyond just the padlock icon.
- Review common hosting mistakes that create vulnerabilities at the server level, such as leaving directory listing enabled or using shared hosting without isolation.
- Run automated daily backups and store them off-server. Test restores periodically so you know the backup actually works when you need it.
- Set up uptime and file change monitoring. Tools like Jetpack or ManageWP alert you the moment something changes unexpectedly.
Two architectural changes that most guides never mention deserve attention here. First, serving from writable directories enables persistent attacks. If your web server can write to the same directories it serves files from, an attacker who gains access can plant files that survive cleanup. Separating your build and serve stages removes that risk. Second, running services under dedicated non-login users with limited file permissions is a server-level hardening step that significantly reduces what an attacker can do even if they find a way in.
| Security layer | What it protects against |
|---|---|
| Updated CMS and plugins | Exploits targeting known vulnerabilities |
| MFA on admin accounts | Credential stuffing and brute force attacks |
| WAF and CDN | Automated scanning bots and DDoS attempts |
| Immutable runtime directories | Persistent file-based backdoors |
| Off-server backups | Ransomware and catastrophic data loss |
| File permission hardening | Privilege escalation after initial compromise |
For a deeper look at the specific security features worth requesting from your hosting provider, Digihost Guide’s guide on website security features covers what to look for and what to ask.
My take on fixing hacked websites
I have worked through enough hacked site recoveries to say this clearly: most of them were preventable, and most of the cleanups that failed did so because the site owner fixed the symptom instead of the cause.
The single biggest mistake I see is people scanning for malware, removing the flagged files, and calling it done. They never ask how the attacker got in. Three days later, the site is reinfected through the same vulnerability. The forensic backup I mentioned earlier is not just a safety net. It is your investigation tool. Without it, you are cleaning blind.
The architectural insight that changed how I think about this is the writable directory problem. Attack persistence in compromised sites almost always results from production directories that the web server can write to. If you fix that one thing, you make the attacker’s job dramatically harder even if they find another way in.
I have also seen site owners panic and pay for professional repair services that charge around $119 per WordPress site and complete fixes in 24 to 48 hours. That is a reasonable option when you are out of your depth or when the business cost of downtime is high. There is no shame in it. But if you follow the steps in this guide carefully, most WordPress hacks are within reach of a technically capable site owner.
The mindset shift that actually sticks is treating security as a layer of ongoing operations, not a project you complete once. Backups, updates, monitoring, and access control are not extras. They are the job.
— Stefan
Choosing a secure host makes recovery easier
If this experience has made you think harder about your hosting setup, that instinct is worth following. The quality of your hosting provider directly affects how quickly you can recover from a hack, whether you have access to clean backups, and how much support you get during a crisis. Digihost Guide has done the research to help you make a smarter choice. Read the top web hosting reviews to compare security features, support quality, and backup policies across the leading providers. If you want a shortlist, the top web hosting providers page highlights the best options across different use cases and budgets.
FAQ
How long does it take to fix a hacked website?
The manual cleanup process typically takes around 90 minutes for a standard WordPress site, with Google’s security review taking an additional 24 to 72 hours. More complex infections or ransomware cases take longer and may require professional help.
Can I recover a hacked site without a backup?
Yes, but it is significantly harder. You will need to replace all core files from fresh downloads, manually inspect your database, and work without a clean reference point. A forensic backup taken before cleanup makes the process much more reliable.
How do I remove a Google malware warning from my site?
After completing your cleanup, submit a review request through Google Search Console under the Security Issues section. Google re-evaluates the warning within 24 to 72 hours of your request.
What is the most common way websites get hacked?
Most WordPress breaches stem from outdated or abandoned plugins and weak passwords. Keeping everything updated and enforcing strong credentials eliminates the majority of common attack vectors.
Should I pay the ransom if my site is hit with ransomware?
No. Paying the ransom carries no guarantee that your files will be restored. The recommended approach is to restore from a clean backup on a freshly provisioned, patched server.

